

Raised Garden Bed Irrigation Setup: The Ultimate Beginner’s Guide to Efficient Drip Watering in the UK (2026)
Welcome to Elemon.co.uk—where we bring you the Products of Tomorrow… Today.
Whether you’re growing fresh vegetables, colourful flowers, fragrant herbs, or a combination of all three, keeping your raised garden beds consistently watered is one of the biggest challenges facing UK gardeners. While hand watering may seem simple at first, it quickly becomes time-consuming, inconsistent, and surprisingly wasteful—especially during the warmer months.
A well-designed drip irrigation system transforms the way you care for your garden. Instead of spending hours with a watering can or hosepipe, your plants receive the right amount of water exactly where they need it—directly at their roots. The result is healthier plants, stronger root systems, fewer weeds, lower water bills, and more free time to actually enjoy your garden.
In this complete Elemon.co.uk guide, you’ll learn how to design, install, and maintain a reliable raised garden bed irrigation system suitable for the UK’s changing climate. Whether you’re building your very first raised bed or upgrading an existing vegetable garden, this step-by-step guide will help you create an efficient watering system that can last for years.
Table of Contents
- Why Raised Beds Need Irrigation
- Benefits of Drip Irrigation
- Understanding UK Weather
- Choosing the Right Irrigation System
- Planning Your Garden Layout
- Tools & Materials
- Water Usage Calculator
- Installation Guide
- Maintenance & Troubleshooting
- FAQs, Recommendations
Why Raised Garden Beds Need Irrigation
Raised beds offer many advantages over planting directly into the ground, including:
- Better drainage
- Improved soil quality
- Easier maintenance
- Fewer weeds
- Reduced soil compaction
- Higher crop yields
- More comfortable gardening
However, these benefits come with one important trade-off.
Raised beds dry out significantly faster than traditional garden soil.
Since they are elevated above ground level, air circulates around all sides of the bed, increasing evaporation. During warm summer days, a raised bed can lose moisture surprisingly quickly, particularly if it’s filled with free-draining compost.
Without regular watering, plants may suffer from:
- Stunted growth
- Wilting leaves
- Blossom end rot (tomatoes)
- Bitter vegetables
- Reduced harvests
- Increased susceptibility to pests and disease
Consistent moisture is one of the biggest factors in producing healthy crops.
Why Drip Irrigation Is Better Than Hand Watering
Many beginner gardeners rely on a watering can or hosepipe. While these methods work, they’re often inefficient.
Here’s how they compare.
| Feature | Hand Watering | Drip Irrigation |
|---|---|---|
| Water Efficiency | ★★☆☆☆ | ★★★★★ |
| Time Required | High | Very Low |
| Plant Health | Variable | Excellent |
| Weed Growth | High | Low |
| Water Waste | High | Minimal |
| Automation | No | Yes |
| Consistency | Depends on user | Excellent |
With drip irrigation, water is delivered slowly and directly to the root zone, where plants absorb it most effectively.
This means:
- Less evaporation
- Less runoff
- Less water on leaves
- Reduced fungal diseases
- Better soil moisture balance
How Drip Irrigation Works
Unlike sprinklers, which spray water into the air, drip irrigation uses low-pressure tubing fitted with emitters.
Each emitter releases water slowly over time.
Typically:
- 1 litre/hour
- 2 litres/hour
- 4 litres/hour
- 8 litres/hour
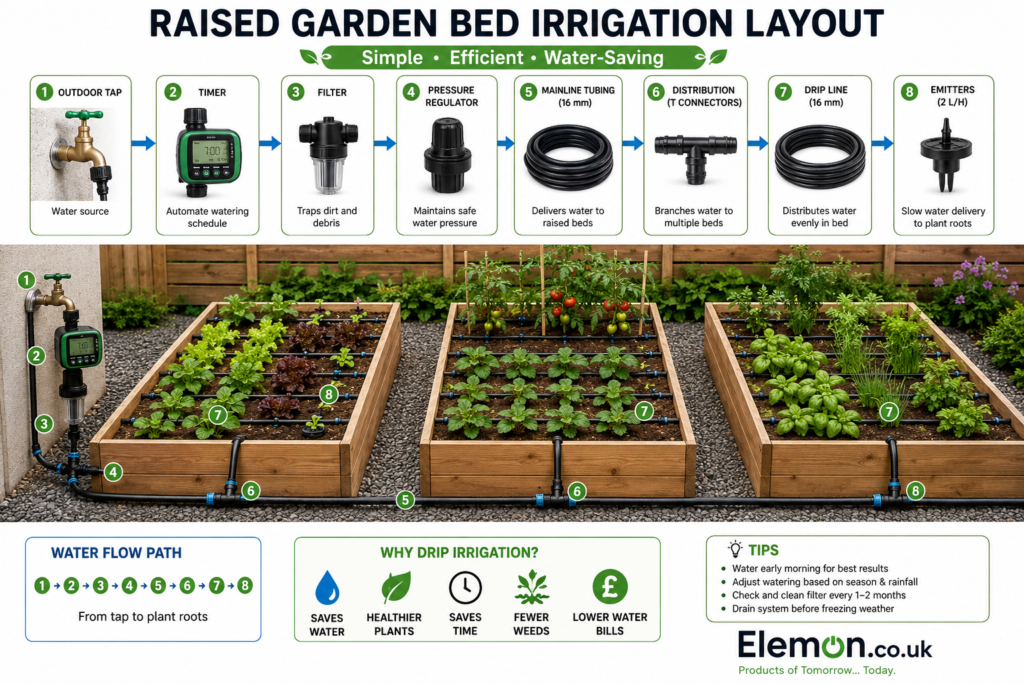
Water travels through:
Outdoor tap
↓
Timer (optional)
↓
Filter
↓
Pressure regulator
↓
Main supply hose
↓
Distribution tubing
↓
Drippers
↓
Plant roots
Simple.
Efficient.
Reliable.
Understanding the UK’s Climate
Designing irrigation for the UK differs from designing one for hotter climates like Spain or Australia.
The UK experiences:
- Frequent rainfall
- Sudden heatwaves
- Long damp periods
- Water restrictions during droughts
- Frost in winter
Your irrigation system should therefore be designed for flexibility rather than constant watering.
Spring
Water only when necessary.
Rain often provides enough moisture.
Summer
Increase watering frequency.
During hot weather, raised beds may require watering every day.
Autumn
Gradually reduce irrigation.
Monitor soil moisture instead of following a fixed schedule.
Winter
Drain the system before freezing temperatures arrive.
Frozen water can split pipes and damage fittings.
Choosing the Right Irrigation System
Several irrigation methods work well in raised beds.
Each has its advantages.
1. Drip Line (Recommended)
A flexible pipe contains evenly spaced emitters.
Perfect for:
- Vegetables
- Herbs
- Flowers
Pros
✔ Easy installation
✔ Even watering
✔ Affordable
✔ Reliable
Cons
✖ Less flexible for unusual layouts
2. Individual Drippers
Separate emitters connect directly to each plant.
Best for:
- Tomatoes
- Cucumbers
- Peppers
- Fruit bushes
Pros
- Precise watering
- Adjustable flow
- Expandable
Cons
- Takes longer to install
3. Soaker Hose
A porous hose slowly leaks water along its length.
Suitable for:
- Large flower beds
- Shrubs
- Borders
Pros:
- Low cost
- Easy installation
Cons:
- Less accurate
- Uneven water distribution over long distances
4. Micro Sprayers
Tiny sprinklers cover a larger area.
Suitable for:
- Seedlings
- Salad crops
- Greenhouses
Pros:
- Wide coverage
Cons:
- More evaporation
- Greater risk of fungal disease
Which System Is Best?
| Garden Type | Recommended System |
|---|---|
| Vegetables | ⭐⭐⭐⭐⭐ Drip Line |
| Herbs | ⭐⭐⭐⭐⭐ Drip Line |
| Tomatoes | ⭐⭐⭐⭐⭐ Individual Drippers |
| Strawberries | ⭐⭐⭐⭐ Drip Line |
| Flower Beds | ⭐⭐⭐⭐ Soaker Hose |
| Greenhouse | ⭐⭐⭐⭐⭐ Drippers + Timer |
For most UK home gardeners, a drip line combined with an automatic timer offers the best balance of simplicity, efficiency, and reliability.
Planning Your Raised Bed Irrigation
Before purchasing any equipment, spend a little time planning your layout. A well-designed system is easier to install, uses less water, and is simpler to expand in the future.
Step 1: Measure Your Beds
Record:
- Length
- Width
- Height
- Number of beds
Example:
| Raised Bed | Size |
|---|---|
| Bed 1 | 2.4 × 1.2 m |
| Bed 2 | 2.4 × 1.2 m |
| Bed 3 | 1.8 × 0.9 m |
These measurements will determine how much mainline tubing, drip line, and how many fittings you’ll need.
Step 2: Identify Your Water Source
Most systems connect directly to a standard outdoor tap, but alternatives include:
- Water butts (with a suitable pump if pressure is low)
- Rainwater harvesting systems
- Garden storage tanks
- Dedicated irrigation pumps
Place the water source as centrally as possible to minimise long pipe runs and reduce pressure loss.
Step 3: Group Plants by Water Needs
Not every plant requires the same amount of water. Designing irrigation zones helps avoid overwatering and underwatering.
| Water Requirement | Typical Plants |
|---|---|
| High | Tomatoes, cucumbers, courgettes |
| Medium | Lettuce, spinach, peppers |
| Low | Rosemary, thyme, lavender, sage |
Grouping similar plants together makes scheduling easier and improves overall plant health.
Essential Tools & Materials
Having the right components before you start will make installation much smoother.
| Item | Purpose |
|---|---|
| Main supply tubing (13–16 mm) | Carries water to the beds |
| Drip line | Delivers water evenly to plants |
| Pressure regulator | Protects the system from high mains pressure |
| Filter | Prevents emitters from clogging |
| Automatic timer | Waters plants on a schedule |
| Tee connectors | Branches pipework |
| Elbows | Creates neat corners |
| End caps | Seals pipe ends |
| Ground stakes | Holds tubing securely in place |
| Hole punch | Adds emitters or connectors accurately |
| Pipe cutter | Produces clean cuts for leak-free joints |
Water Usage Planning
One of the biggest advantages of drip irrigation is how efficiently it uses water. Planning your system around estimated consumption helps you choose the correct timer settings and avoid unnecessary waste.
| Garden Size | Estimated Daily Water Use (Summer) |
|---|---|
| 1 Small Raised Bed | 15–25 litres |
| 2 Medium Raised Beds | 30–50 litres |
| 4 Large Raised Beds | 60–90 litres |
| Large Vegetable Garden | 100–150 litres |
These figures are estimates and will vary depending on weather, soil type, crop selection, and rainfall.
Step-by-Step Installation Guide
Now that you’ve planned your layout and gathered your materials, it’s time to build your irrigation system. Don’t worry if you’ve never installed one before—most beginner kits are designed to be straightforward, and with a little patience you can complete a typical two-bed setup in just a couple of hours.
The key is to work methodically. Measure twice, cut once, and test each section before moving on. A little extra care during installation will reward you with a reliable system that needs very little maintenance.
Step 1 – Prepare the Raised Beds
Before laying any irrigation tubing, prepare the growing area.
Remove:
- Large stones
- Weeds
- Old roots
- Garden debris
Check that the soil surface is reasonably level. Drip irrigation works best when water can soak evenly into the soil rather than pooling in one corner.
If your raised beds are newly built, fill them with quality compost and water the soil thoroughly before installing the drip lines. Moist soil helps you position the tubing accurately and reduces movement after installation.
Step 2 – Install the Outdoor Tap Timer
One of the biggest advantages of a modern irrigation system is automation.
A battery-powered timer connects directly to your outdoor tap and opens or closes the water supply according to your chosen schedule.
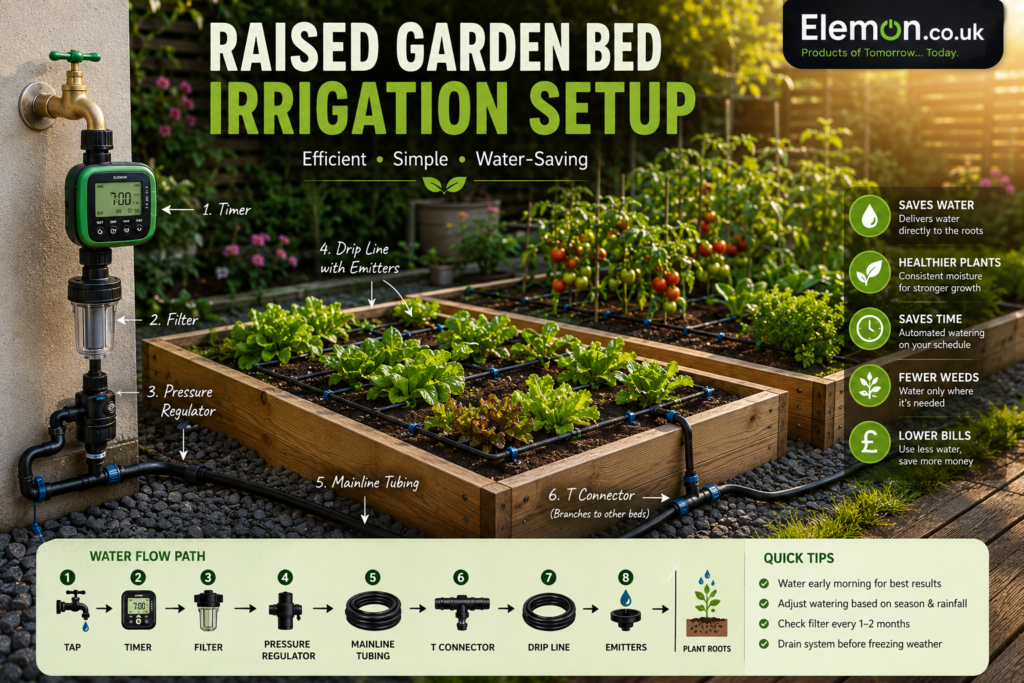
Typical installation order
Outdoor Tap
      │
      ▼
Automatic Timer
      │
      ▼
Filter
      │
      ▼
Pressure Regulator
      │
      ▼
Main Supply Hose
Why use a timer?
✔ Water early in the morning
✔ Water while you’re at work
✔ Continue watering during holidays
✔ Avoid forgetting to water
✔ Reduce water waste
During summer, watering between 5:00–8:00 am is generally the most efficient time, as evaporation is much lower than during the afternoon.
Step 3 – Fit the Filter
Even clean mains water can contain tiny particles that gradually clog drip emitters.
A small inline filter captures:
- Sand
- Rust
- Dirt
- Debris
Cleaning the filter every few months can significantly extend the life of your irrigation system.
If you’re using harvested rainwater, a filter is even more important because organic material such as leaves and algae can enter the pipework.
Step 4 – Install the Pressure Regulator
Many UK outdoor taps supply water at a much higher pressure than drip systems are designed to handle.
Without a pressure regulator you may experience:
- Blown fittings
- Uneven watering
- Split tubing
- Damaged emitters
A pressure regulator keeps the water flow gentle and consistent, allowing each emitter to deliver approximately the same amount of water.
Step 5 – Lay the Main Supply Line
The main supply hose distributes water from the tap to each raised bed.
Lay the pipe neatly along pathways or borders where it is protected from foot traffic.
Tips
- Avoid sharp bends.
- Leave a little slack for expansion in warm weather.
- Secure the hose every 1–2 metres using ground stakes.
- Keep the layout tidy for easier maintenance.
If your garden has multiple raised beds, create a branching layout using T-connectors.
Example:
Tap
 │
 │
 ├──────── Bed 1
 │
 ├──────── Bed 2
 │
 └──────── Bed 3
This layout provides balanced water distribution and makes future expansion much easier.
Step 6 – Install the Drip Line
Now it’s time to place the drip tubing within each raised bed.
For most vegetable beds, position the tubing in parallel rows spaced approximately 25–35 cm apart.
Example:
□□□□□□□□□□□□□□

────────────

────────────

────────────

□□□□□□□□□□□□□□
Plants growing between the rows receive moisture from both sides, creating an even watering pattern.
For wider beds, add additional rows rather than increasing the spacing too much.
Recommended Drip Line Spacing
| Bed Width | Number of Drip Lines |
|---|---|
| 60 cm | 2 |
| 90 cm | 3 |
| 120 cm | 4 |
| 150 cm | 5 |
Step 7 – Install Individual Emitters (Optional)
Some crops benefit from individual drippers rather than continuous drip line.
Examples include:
- Tomatoes
- Chillies
- Aubergines
- Cucumbers
- Fruit bushes
- Young trees
Using a hole punch, insert emitters into the tubing close to each plant.
Common flow rates
| Emitter Size | Water Output |
|---|---|
| 1 L/hr | Small herbs |
| 2 L/hr | Most vegetables |
| 4 L/hr | Tomatoes |
| 8 L/hr | Fruit bushes |
Choosing the correct flow rate helps avoid both waterlogging and drought stress.
Step 8 – Secure the Tubing
Once everything is positioned correctly, secure the tubing using ground stakes.
Stakes help to:
- Prevent movement
- Keep emitters correctly positioned
- Protect tubing from wind
- Make maintenance easier
Aim to place a stake every 40–60 cm, with additional stakes around bends and corners.
Step 9 – Flush the System
Before sealing the ends of the pipework, allow water to run through the system for several minutes.
This flushes out:
- Plastic shavings
- Dust
- Dirt
- Manufacturing residue
Skipping this step can lead to clogged emitters shortly after installation.
Step 10 – Seal the Pipe Ends
Once the system has been flushed, install the end caps or fold-and-clamp fittings supplied with your kit.
Turn the water back on and inspect every connection carefully.
Look for:
- Leaks
- Loose fittings
- Twisted tubing
- Uneven water flow
Fixing small issues now prevents bigger problems later.
Testing Your Irrigation System
Run the system for around 20–30 minutes and observe how the water spreads through the soil.
Check that:
✔ Every emitter is working.
✔ Water reaches the root zone.
✔ There are no dry patches.
✔ No puddles are forming.
✔ Connections remain leak-free.
If some areas appear too dry, add an extra emitter or reposition the drip line.
Programming Your Timer
Every garden is different, but the following table provides a useful starting point for UK conditions.
| Season | Frequency | Typical Duration |
|---|---|---|
| Spring | Every 2–3 days | 20–30 minutes |
| Summer | Daily | 25–45 minutes |
| Heatwave | Daily (sometimes twice) | 30–60 minutes |
| Autumn | Every 3–5 days | 15–25 minutes |
| Winter | Usually Off | — |
Rather than sticking rigidly to a schedule, adjust watering based on rainfall and soil moisture. After heavy rain, you may be able to skip several watering cycles.
Water-Saving Tips
A drip system is already one of the most efficient ways to irrigate, but these extra practices can reduce water use even further.
Apply Mulch
Cover the soil with:
- Bark chips
- Straw
- Compost
- Wood chippings
Mulch reduces evaporation, suppresses weeds, and helps maintain even soil temperatures.
Water Early
Morning watering allows moisture to soak into the soil before the heat of the day increases evaporation.
Harvest Rainwater
Installing a water butt connected to a roof downpipe provides a free source of water for much of the year. If pressure is insufficient for drip irrigation, consider adding a small garden pump designed for rainwater systems.
Monitor Soil Moisture
Instead of watering by habit, check the soil first.
Insert your finger about 5 cm into the soil:
- Dry = Water.
- Damp = Wait another day.
This simple test helps prevent overwatering.
Common Mistakes Beginners Make
| Mistake | Better Approach |
|---|---|
| Using high pressure without a regulator | Always install a pressure regulator |
| Skipping the filter | Protect emitters from clogging |
| Installing too few drip lines | Match line spacing to bed width |
| Watering in the afternoon | Water early morning |
| Ignoring rainfall | Adjust the timer regularly |
| Letting tubing sit loose | Secure with ground stakes |
| Forgetting winter maintenance | Drain the system before frost |
Seasonal Maintenance
A well-maintained drip irrigation system can provide reliable service for many years.
Spring
- Check for winter damage.
- Replace cracked fittings.
- Clean filters.
- Test timers.
- Flush the pipework.
Summer
- Inspect emitters monthly.
- Remove algae or debris.
- Adjust watering duration during hot spells.
Autumn
- Reduce watering frequency.
- Clean filters again.
- Inspect for leaks before winter.
Winter
In areas where freezing temperatures are expected:
- Turn off the water supply.
- Disconnect the timer if recommended by the manufacturer.
- Drain all tubing.
- Store removable components indoors.
- Leave the system empty until spring.
Taking these precautions helps prevent frost damage and ensures the system is ready for the next growing season.
Troubleshooting Guide
| Problem | Possible Cause | Solution |
|---|---|---|
| Weak water flow | Dirty filter | Clean or replace the filter |
| Dry plants | Blocked emitter | Remove and flush the emitter |
| Leaking connection | Loose fitting | Push tubing fully into the connector |
| Uneven watering | Pressure too high or low | Check the regulator and layout |
| Timer not operating | Flat batteries | Replace batteries and reprogram |
| Excessively wet soil | Watering for too long | Reduce timer duration |
My Experience
After testing various watering methods over the years—from watering cans to oscillating sprinklers and standard garden hoses—I’ve found that a simple drip irrigation system offers the best balance of convenience, water efficiency, and plant health.
One of the biggest advantages isn’t just saving time; it’s the consistency. Plants thrive when they receive a steady supply of moisture rather than alternating between very dry and overly wet soil. Since switching to drip irrigation, I’ve noticed healthier vegetable plants, stronger root systems, fewer weeds, and significantly less wasted water.
For beginners, I recommend starting with a simple timer-controlled kit connected to an outdoor tap. As your garden grows, it’s easy to expand the system with additional tubing, emitters, or even smart irrigation controllers.
Another lesson I’ve learned is the importance of quality components. Investing a little more in a reliable timer, filter, and pressure regulator pays off in the long run by reducing maintenance and preventing frustrating leaks or blockages.
If I were starting again today, I’d install a drip system from the beginning rather than waiting until the garden was fully established. It saves time, protects your plants during holidays, and makes gardening much more enjoyable.
Frequently Asked Questions
How often should I water raised beds in the UK?
It depends on the season, weather, and the plants you’re growing. During summer, most raised beds benefit from watering once a day, while in spring and autumn every two to four days is often enough. Always check the soil before watering.
Is drip irrigation better than a sprinkler?
Yes. Drip irrigation delivers water directly to the roots, reducing evaporation, runoff, and the risk of fungal diseases caused by wet foliage.
Can I use rainwater?
Absolutely. Rainwater is excellent for most garden plants. If you’re using a water butt, you may need a small pump to provide enough pressure for a drip system.
How long does drip irrigation tubing last?
Quality UV-resistant tubing typically lasts between 8 and 15 years, depending on sun exposure and maintenance.
Can I install the system myself?
Yes. Most beginner kits require only basic DIY skills and can usually be installed in a few hours using simple hand tools.
Do I need electricity?
No. Most garden irrigation timers are battery-powered, making them easy to install without electrical wiring.
Can drip irrigation be used in greenhouses?
Yes. In fact, drip irrigation is one of the most effective watering methods for greenhouses, helping maintain consistent soil moisture while reducing humidity around plant leaves.
Recommended Accessories
Adding a few extra components can improve reliability and make your system easier to maintain.
| Product | Why It’s Useful |
|---|---|
| Battery Tap Timer | Automatic watering schedule |
| Pressure Regulator | Protects emitters and tubing |
| Inline Filter | Prevents clogging |
| Drip Irrigation Kit | Complete beginner solution |
| Extra Drip Line | Expand future beds |
| Pipe Stakes | Keeps tubing secure |
| T-Connectors | Easy branching |
| End Caps | Simple maintenance |
| Soil Moisture Meter | Prevents overwatering |
| Rainwater Pump | Improves pressure from water butts |
These products are widely available from UK garden centres and major online retailers.
Estimated Project Cost (UK)
| Garden Size | Estimated Cost |
|---|---|
| One Raised Bed | £35–£60 |
| Two Raised Beds | £60–£100 |
| Four Raised Beds | £100–£180 |
| Large Vegetable Garden | £180–£350+ |
While there is an upfront investment, the long-term benefits include reduced water waste, healthier plants, and significant time savings.
Key Takeaways
- Raised beds dry out faster than traditional garden soil and benefit greatly from consistent irrigation.
- Drip irrigation is one of the most water-efficient methods available, delivering moisture directly to the plant roots.
- A timer, pressure regulator, and filter are essential components for a reliable system.
- Group plants with similar watering needs to improve efficiency.
- Regular maintenance, including flushing lines and cleaning filters, extends the life of your irrigation system.
- Mulching, harvesting rainwater, and monitoring soil moisture can further reduce water consumption.
- Starting with a basic system allows you to expand easily as your garden grows.
UK Regulations & Safety Information
Before installing any irrigation system, check whether your local water supplier has introduced temporary hosepipe restrictions during periods of drought. These restrictions can vary across the UK and may affect how and when you are permitted to use mains water for garden irrigation.
When connecting irrigation equipment to your mains water supply:
- Use products suitable for UK plumbing fittings.
- Follow the manufacturer’s installation instructions.
- Avoid creating trip hazards with exposed pipework.
- Inspect hoses and fittings regularly for leaks.
- Drain the system before freezing weather to prevent frost damage.
If you’re connecting irrigation systems to rainwater harvesting equipment or pumps, ensure all components are installed safely and in accordance with the manufacturer’s guidance.
Related Articles on Elemon.co.uk
Continue building your smart garden with these guides:
- Smart Thermostat Calibration Guide
- Solar Lighting Placement Map
- DIY Smart Security Setup
- LED Strip Power Calculator
- Smart Home Wall Panel Guide
- Solar vs Wired Garden Lights
- Modern Pergola Build Blueprint
- Solar-Powered Water Feature
- Outdoor LED Pathway Design
- Weatherproof Outdoor Shelving
Disclaimer
This article is intended for informational and educational purposes only. Every garden is different, and irrigation requirements vary depending on soil type, climate, plant selection, and local conditions. Always follow the manufacturer’s installation instructions and seek professional advice where necessary.
All images used in this article are for reference purposes only.
Affiliate Disclaimer: As an Amazon Associate, Elemon.co.uk earns from qualifying purchases. This helps support the website at no extra cost to you.
Conclusion
Installing a drip irrigation system in your raised garden beds is one of the most rewarding DIY improvements you can make. It saves time, conserves water, supports healthier plants, and takes much of the guesswork out of watering.
Whether you’re growing herbs on a patio or managing several productive vegetable beds, a well-planned irrigation system provides reliable, consistent moisture exactly where it’s needed. Combined with good soil, thoughtful planting, and regular maintenance, it’s an investment that pays dividends season after season.
At Elemon.co.uk, our goal is to help you build smarter homes and more efficient outdoor spaces—bringing you the Products of Tomorrow… Today.