
DIY LED Strip Lighting Installation: Transform Any Room with Modern Accent Lighting
LED strip lighting has become one of the most popular home improvement upgrades thanks to its affordability, flexibility, and dramatic visual impact. From illuminating kitchen worktops to creating ambient bedroom lighting or enhancing a home entertainment setup, LED strips offer a simple way to modernise any space.
This guide explains how to choose, install, and maintain LED strip lights for a clean, professional-looking result.
Why Choose LED Strip Lighting?
LED strip lights provide several advantages over traditional lighting solutions:
- Energy-efficient and low-cost to run
- Easy DIY installation
- Available in multiple colours and brightness levels
- Flexible enough for tight spaces and corners
- Compatible with smart home systems and voice assistants
Whether you’re aiming for practical task lighting or decorative mood lighting, LED strips can be adapted to suit almost any room.

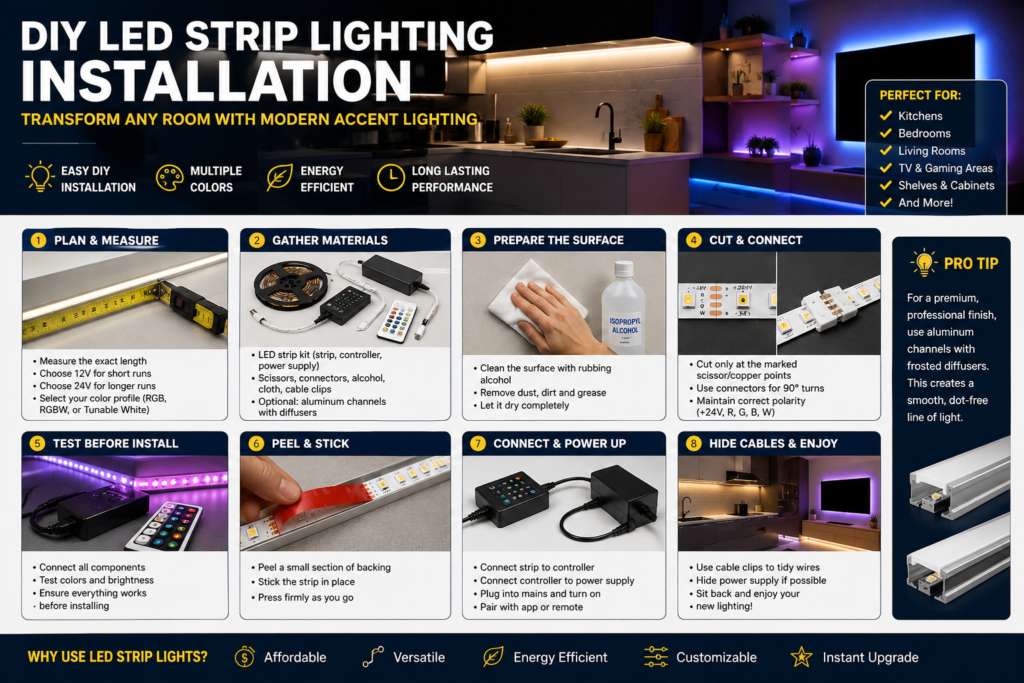
Step 1: Plan Your Installation
Good planning prevents wasted materials and ensures a smooth installation.
Measure the Installation Area
Carefully measure the surface where the LED strips will be installed. Common locations include:
- Under kitchen cabinets
- Behind televisions
- Along shelving units
- Under stair treads
- Around ceiling coving
- Behind headboards
Accurate measurements help determine the length of strip required and the appropriate power supply.
Select the Right LED Strip
12V vs 24V Systems
12V LED Strips
- Ideal for shorter installations
- Commonly used in bedrooms and small projects
24V LED Strips
- Better for longer runs
- Reduced brightness loss across the strip
- Suitable for larger rooms and continuous lighting designs
Choose Your Lighting Style
RGB LED Strips
Offer millions of colour combinations and are popular for gaming rooms and entertainment areas.
RGBW LED Strips
Include a dedicated white LED alongside colour options, providing more natural everyday lighting.
Tunable White LED Strips
Allow adjustment between warm and cool white tones to match different activities and times of day.
Step 2: Gather Your Tools and Materials
Before starting, prepare the following:
- LED strip lighting kit
- Compatible power supply
- LED controller or smart hub
- Measuring tape
- Sharp scissors
- Solderless connectors
- Isopropyl alcohol
- Microfibre cloth
- Cable clips
Optional upgrades:
- Aluminium LED channels
- Frosted diffuser covers
- Extension cables
Step 3: Prepare the Surface Properly
Surface preparation is often overlooked but is critical for long-term durability.
Clean Thoroughly
Dust, grease, and moisture can weaken the adhesive backing. Clean the installation area using isopropyl alcohol and a lint-free cloth.
Avoid household cleaning sprays as they may leave behind residue that reduces adhesion.
Allow the Surface to Dry
Wait until the area is completely dry before attaching any lighting components.
Step 4: Cut and Connect the LED Strips
Most LED strips can be customised to fit your exact layout.
Cutting the Strip
Only cut at the manufacturer’s marked cutting points, usually indicated by:
- Scissor symbols
- Copper contact pads
Cutting elsewhere can permanently damage the strip.
Navigating Corners
Avoid sharply folding LED strips around corners. Instead:
- Cut at a designated cut point.
- Use a corner connector.
- Reconnect the sections at the required angle.
This protects the internal circuitry and ensures reliable operation.
Extending Across Gaps
When crossing obstacles or open spaces, use extension wires and strip connectors while maintaining the correct polarity.
Step 5: Test Before Installation
Before removing the adhesive backing:
- Connect the LED strip.
- Attach the controller.
- Plug in the power supply.
- Test all colours and brightness settings.
Checking everything beforehand can save significant time if a component is faulty.
Step 6: Install the LED Strips
Peel and Apply
Remove a small section of backing at a time rather than exposing the entire adhesive strip.
Press firmly into place while working along the installation path.
Ensure Strong Adhesion
Apply even pressure across the full length of the strip to maximise bonding strength.
For challenging surfaces, consider using mounting clips or aluminium channels for additional support.
Step 7: Create a Professional Finish
For premium-looking installations, aluminium channels are highly recommended.
Benefits include:
- Improved heat dissipation
- Increased LED lifespan
- Cleaner appearance
- Reduced visibility of individual LED points
- More even light distribution
Combined with a frosted diffuser, the result closely resembles high-end architectural lighting.
Step 8: Connect and Hide the Wiring
Once the strips are secured:
- Connect the strip to the controller.
- Connect the controller to the power supply.
- Plug into a mains socket.
- Pair with any smart home applications if applicable.
Use cable clips, cable trunking, or hidden routing paths to keep wires tidy and maintain a clean appearance.
Maintenance Tips
To keep your LED lighting performing at its best:
- Dust strips periodically with a dry cloth
- Avoid exposing indoor strips to moisture
- Check connectors annually
- Replace damaged sections promptly
- Ensure power supplies remain ventilated
Final Thoughts
LED strip lighting is one of the simplest upgrades that can dramatically improve the atmosphere and functionality of a room. With careful planning, proper surface preparation, and neat cable management, even a beginner can achieve a professional-quality installation.
Whether you’re enhancing a modern kitchen, creating a cinema-style media wall, or adding subtle ambient lighting to a bedroom, LED strip lights offer an affordable and highly effective solution for today’s home.
My Experience
I recently installed LED strip lighting in my home office and entertainment area, and the difference was immediate. The project required only basic tools and took less than a couple of hours to complete. One lesson I learned was the importance of thoroughly cleaning the mounting surface before installation. In areas where I skipped proper cleaning, the adhesive struggled to hold over time.
I also found that using aluminium channels with diffuser covers significantly improved the overall appearance. Instead of seeing individual LED dots, the lighting looked smooth and professional. For anyone considering this upgrade, I highly recommend spending a little extra on quality channels and connectors.
Key Takeaways
- LED strip lighting is one of the easiest DIY home upgrades.
- Proper measuring and planning help avoid installation mistakes.
- Always clean surfaces with isopropyl alcohol before mounting.
- Only cut LED strips at marked cutting points.
- Use connectors rather than bending strips around sharp corners.
- Test the entire system before attaching it permanently.
- Aluminium channels create a more premium and professional finish.
- Smart-enabled LED strips offer greater flexibility and convenience.
Related Articles
You may also enjoy these guides on Elemon.co.uk:
- DIY Smart Home Wall Panel (LED + Acoustic Foam)
- Outdoor Solar Lighting Guide for UK Homes
- DIY Home Office Setup Guide
- Smart Home Automation for Beginners
- Best Budget Smart Lighting Solutions
- DIY Floating Shelf with Integrated Lighting
UK Regulations & Safety Information
Before installing LED strip lighting in the UK, consider the following safety recommendations:
- Always follow the manufacturer’s installation instructions.
- Use CE or UKCA-certified products whenever possible.
- Ensure power supplies are suitable for UK mains voltage (230V).
- Do not overload extension leads or power adapters.
- Keep indoor-rated LED strips away from moisture and outdoor exposure.
- For permanent electrical modifications, consult a qualified electrician.
- If installing lighting in bathrooms or other special locations, comply with current UK electrical safety regulations and IP rating requirements.
Safety should always take priority over aesthetics when working with electrical equipment.
Disclaimer
This article is intended for informational and educational purposes only. While every effort has been made to ensure accuracy, Elemon.co.uk accepts no responsibility for injury, damage, or loss resulting from the use of information contained in this guide. Always follow manufacturer instructions and seek professional advice where necessary.
Image Disclaimer; All images are for reference purposes only. Actual products, colours, installation methods, and finished results may vary depending on manufacturer specifications, room conditions, and individual project requirements.