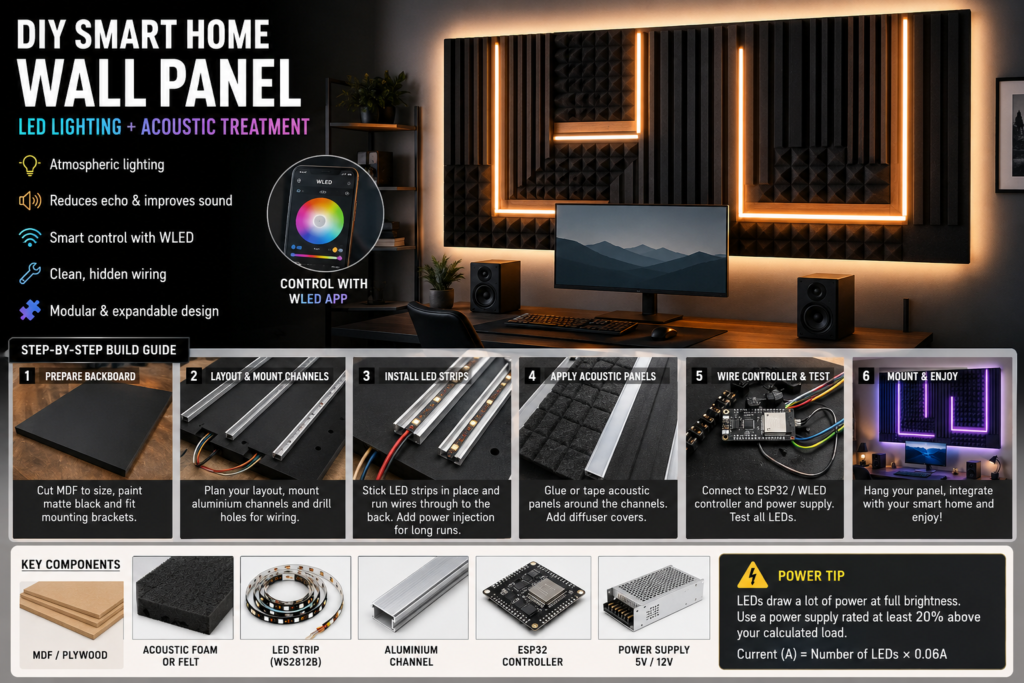

DIY Smart Home Wall Panel: Combine LED Lighting and Acoustic Treatment
Modern smart homes are no longer just about gadgets and voice assistants. Some of the most impressive upgrades combine technology, design, and practicality into a single feature. A DIY smart wall panel that integrates programmable LED lighting with acoustic treatment is one of those rare projects that looks fantastic while also improving the room itself.
Whether you’re creating a gaming setup, home cinema, music room, streaming studio, or simply upgrading a modern living space, this project delivers dramatic visual impact while helping reduce unwanted echoes and sound reflections.
Unlike sticking acoustic foam directly to a wall, building everything onto a dedicated backing panel creates a cleaner, more professional finish. It also keeps cables hidden, allows easier maintenance, and can be installed or removed without damaging large sections of plasterboard.
Why Build a Smart Acoustic Wall Panel?
This project offers several advantages over traditional decorative wall lighting:
- Improves room acoustics by reducing echo and reverb
- Creates customisable ambient lighting
- Hides wiring and electronics neatly
- Works with smart home systems
- Can be expanded with additional panels later
- Adds a premium feature wall appearance
The result is a practical installation that looks far more expensive than it actually costs to build.
Planning Your Design
Before purchasing materials, decide where the panel will be installed and what purpose it will serve.
Common locations include:
- Behind a desk setup
- Around a television or projector screen
- Behind a bed headboard
- Music production spaces
- Streaming and podcast rooms
- Gaming rooms
Sketch a simple layout showing where lighting channels and acoustic sections will sit. Symmetrical designs usually produce the most professional appearance.
Materials and Equipment
Structural Components
| Material | Purpose |
|---|---|
| 9mm–12mm MDF or plywood | Main backing board |
| Timber battens (optional) | Creates rear cable space |
| French cleats or heavy-duty brackets | Wall mounting |
Acoustic Elements
| Material | Purpose |
|---|---|
| Acoustic foam panels | Sound absorption |
| Acoustic felt panels | Cleaner modern appearance |
| Timber acoustic slats | Decorative finish with sound control |
Lighting Components
| Material | Purpose |
|---|---|
| Addressable LED strip | Smart lighting effects |
| Aluminium LED channels | Professional mounting |
| Diffuser covers | Even light distribution |
| Cable clips and connectors | Cable management |
Electronics
| Component | Purpose |
|---|---|
| ESP32 controller | Smart control system |
| Power supply | Powers LEDs |
| WAGO connectors | Safe wiring connections |
| USB cable | Firmware installation |
Step 1: Prepare the Backing Board
Cut the MDF or plywood sheet to your chosen dimensions.
For most feature walls, a panel measuring between 1200mm and 1800mm wide creates a strong visual impact without becoming difficult to handle.
Paint the front face and edges using matte black paint.
This simple step helps disguise any small gaps between foam panels and lighting channels, creating deeper shadows and a cleaner overall appearance.
If you plan to hide cables behind the board, attach timber battens around the rear perimeter to create a shallow cavity.
Install wall mounting hardware before moving on to later stages.
Step 2: Mark the Layout
Position your acoustic panels and lighting channels on the board without fixing anything permanently.
Experiment with different arrangements until you’re satisfied.
Popular layouts include:
- Vertical light bars
- Geometric patterns
- Hexagonal designs
- Offset rectangular sections
- Symmetrical centrepiece arrangements
Once happy with the design, mark all channel positions using a pencil.
Drill cable-routing holes beneath each lighting channel so wiring can disappear behind the board.
This single detail makes the finished installation look significantly more professional.
Step 3: Install LED Channels
Mount aluminium LED channels directly onto the backing board using screws or strong construction adhesive.
These channels provide several benefits:
- Better heat dissipation
- Straighter installation
- Improved durability
- Cleaner appearance
- More even light output
Feed all wiring through the drilled cable holes before fixing the channels permanently.
Take your time during this stage, as accurate alignment will determine how polished the final panel appears.
Step 4: Fit the LED Strips
Install the LED strips inside the channels according to the manufacturer’s instructions.
Addressable LEDs offer the most flexibility because each individual LED can display different colours and effects.
For larger installations, power injection may be required to maintain consistent brightness throughout the strip.
Without adequate power distribution, colours can become inaccurate toward the far end of long LED runs.
Secure all wiring neatly on the rear side of the panel using cable clips or adhesive mounts.
Step 5: Add Acoustic Treatment
Once the lighting system is installed, fit the acoustic elements around the channels.
Depending on your chosen style, this could include:
Acoustic Foam
Affordable and highly effective for reducing echo.
Acoustic Felt
Modern appearance with excellent sound absorption.
Timber Slat Panels
Premium look while still improving room acoustics.
Use construction adhesive, heavy-duty mounting tape, or manufacturer-approved fixing systems.
Ensure all panels fit tightly against the lighting channels to achieve a seamless appearance.
After the acoustic materials are secured, clip the diffuser covers onto the LED channels.
The diffusers transform visible LED dots into smooth, continuous light bars.
Step 6: Connect the Smart Controller
Mount the ESP32 controller and power connections on the rear side of the panel.
Most DIY builders choose WLED firmware because it is free, highly customisable, and widely supported.
After installing the firmware:
- Connect the controller to Wi-Fi
- Configure LED settings
- Test brightness levels
- Create lighting presets
- Verify all LEDs respond correctly
Perform a complete system test before hanging the panel on the wall.
Fixing issues is much easier while everything remains accessible.
Smart Home Integration Ideas
A smart wall panel becomes far more useful when integrated into your existing automation setup.
Home Cinema Mode
When the TV powers on:
- Main lights dim automatically
- Wall panel switches to warm ambient lighting
- Brightness adjusts to viewing conditions
Gaming Mode
Activate:
- Dynamic RGB effects
- Colour matching with games
- Reactive animations
Work Mode
Use:
- Soft white lighting
- Reduced brightness
- Minimal distractions
Evening Relaxation
Schedule:
- Warm colour temperatures
- Gradual dimming
- Sunset-style transitions
Audio-Reactive Lighting
For an even more impressive feature, add a compatible microphone module to your controller setup.
This allows the lighting to respond to:
- Music
- Films
- Games
- Voice frequencies
Combined with acoustic treatment, the result creates an immersive environment ideal for entertainment spaces.
Safety Considerations
LED installations can draw significant current, especially when displaying bright white colours.
Before selecting a power supply, calculate your maximum load carefully.
I = N \times 0.06
Where:
- I = Current in amps
- N = Number of LEDs
- 0.06A represents the maximum current draw per LED at full brightness
Always choose a power supply rated at least 20% above your calculated maximum load.
Additional safety tips:
- Use appropriately sized cables
- Protect exposed connections
- Ensure adequate ventilation
- Avoid covering power supplies with insulation or foam
- Test the system regularly for excessive heat
Final Thoughts
A DIY smart home wall panel combines two upgrades that are often installed separately: atmospheric lighting and acoustic treatment. By integrating both into a single modular structure, you create a feature that not only looks impressive but also improves the way the room sounds and feels.
With careful planning, hidden wiring, and smart automation, this project can become the centrepiece of a gaming room, home cinema, office, or content creation space while remaining fully customisable for future upgrades.
The best part is that the entire system can be built over a weekend using readily available materials and expanded whenever your smart home setup grows.