
Every home develops small problems over time. A dripping pipe under the kitchen sink, a crack appearing in the hallway wall, or a chilly draft creeping in around a window can all seem frustrating at first. The good news is that many of these issues can be fixed with basic tools, a little patience, and some straightforward DIY know-how.
This guide covers three of the most common household maintenance problems and explains how to tackle them safely and effectively.
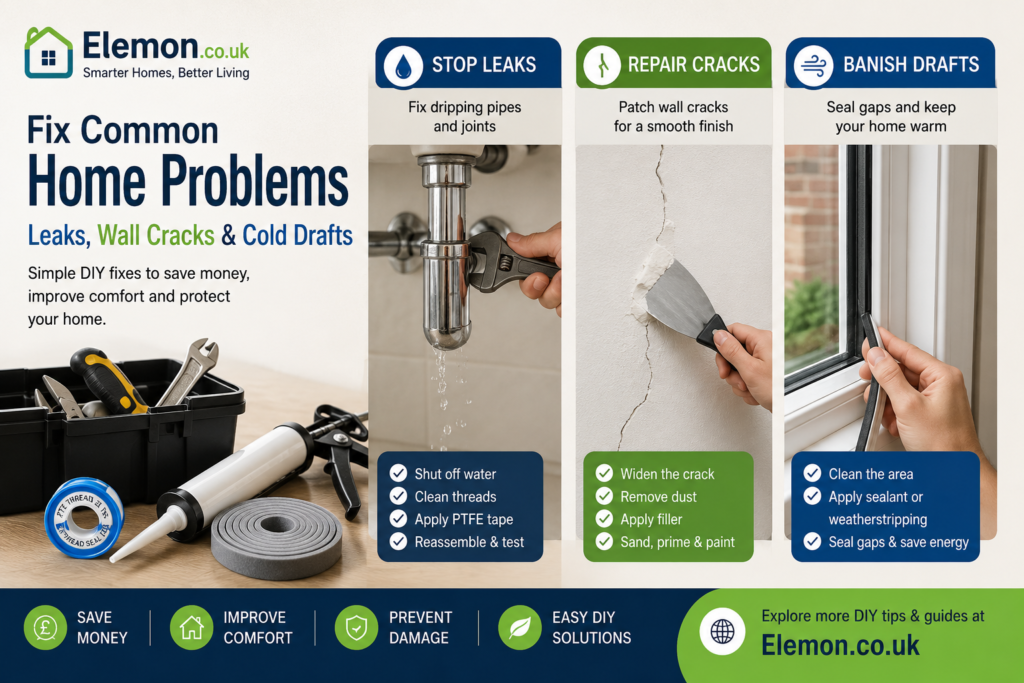
1. Stopping Small Plumbing Leaks Before They Cause Damage
Even a slow drip can waste water and lead to expensive repairs if left unchecked. Minor leaks are often found beneath sinks, around washing machine connections, or at threaded pipe joints.
Signs You Have a Minor Leak
- Damp patches inside cupboards
- Water droplets forming on pipe fittings
- Musty smells near plumbing
- Unexpected increases in water bills
How to Repair a Leaking Pipe Connection
What You’ll Need
- Adjustable spanner
- PTFE thread seal tape
- Old cloth or towel
- Small bucket
- Wire brush or old toothbrush
Step 1: Turn Off the Water Supply
Locate the isolation valve for the affected fixture and turn it off. If no local valve exists, shut off the property’s main stopcock.
Open the tap connected to the pipe to release any remaining water pressure.
Step 2: Remove the Leaking Joint
Place a bucket underneath the fitting and carefully loosen the connection using an adjustable spanner.
Step 3: Clean the Threads
Remove all traces of old sealing tape, dirt, and corrosion from the threads. A clean surface is essential for creating a watertight seal.
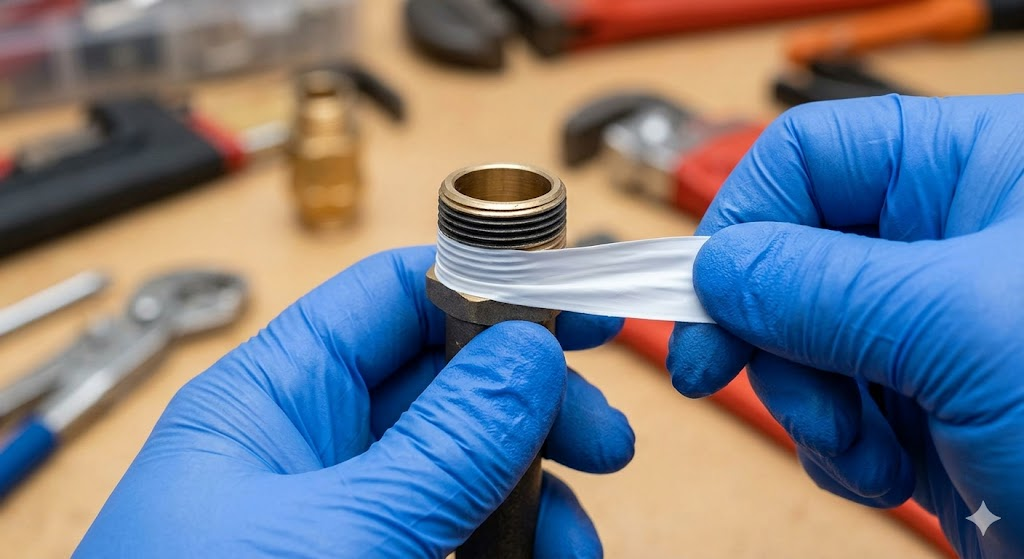
Step 4: Apply Fresh PTFE Tape
Wrap PTFE tape around the male thread in the same direction the fitting tightens.
For most household connections:
- Apply 4–6 wraps
- Keep the tape tight and smooth
- Avoid covering the pipe opening
Step 5: Reconnect and Test
Reassemble the joint by hand before tightening gently with the spanner.
Restore the water supply slowly and check carefully for any signs of dripping. If necessary, tighten slightly further, but avoid overtightening plastic fittings.
2. Repairing Hairline Cracks in Walls and Ceilings
Small cracks are common in homes, especially after seasonal temperature changes or natural settlement of the building.
Most hairline cracks are cosmetic rather than structural, making them ideal for a DIY repair.
When to Seek Professional Advice
Contact a structural specialist if you notice:
- Cracks wider than 5mm
- Diagonal cracks above doors or windows
- Cracks that continue growing
- Doors or windows becoming difficult to open
Repairing Minor Cracks Yourself
Materials Required
- Flexible filler
- Filling knife or scraper
- Fine sandpaper
- Primer
- Matching paint
Step 1: Open the Crack Slightly
Use a filling knife to widen the crack into a shallow V-shape. This allows the filler to penetrate properly instead of simply sitting on the surface.
Step 2: Remove Dust
Brush or vacuum away loose particles to improve adhesion.
Step 3: Apply Flexible Filler
Press filler firmly into the crack and smooth the surface with a filling knife.
Allow the filler to dry according to the manufacturer’s instructions.
Step 4: Sand Smooth
Lightly sand the repaired area until it blends seamlessly with the surrounding wall.
Step 5: Prime and Paint
Apply primer if required, then repaint the area to achieve an invisible repair.
3. Eliminating Drafts Around Doors and Windows
Unwanted drafts make rooms uncomfortable and can significantly increase heating costs during the colder months.
Fortunately, sealing gaps is one of the quickest and most affordable ways to improve energy efficiency.
Finding the Source of a Draft
On a windy day, slowly move your hand around:
- Window frames
- Door edges
- Letterboxes
- Loft hatches
- Skirting boards
You can also use a lit incense stick to detect moving air.
Sealing Fixed Gaps Around Frames
For gaps between walls and window or door frames, decorator’s caulk or exterior-grade sealant provides an effective solution.
Step 1: Remove Old Sealant
Scrape away cracked or loose material and clean the area thoroughly.
Step 2: Apply New Sealant
Cut the nozzle at a slight angle and apply a consistent bead along the gap.
Step 3: Smooth the Finish
Run a damp finger or sealant tool along the bead to create a neat, professional-looking finish.
Sealing Moving Doors and Windows
For openings that need to move freely, weatherstripping is the better option.
Popular choices include:
- Self-adhesive foam strips
- Rubber weather seals
- Brush strips
- Compression seals
Apply the strip along the frame so it compresses when closed, preventing cold air from entering.
Don’t Forget the Bottom of the Door
A door sweep or draft excluder can dramatically reduce heat loss through gaps beneath external doors.
Essential DIY Maintenance Tips
Regular inspections can prevent small issues becoming major repairs.
A few minutes every month checking for leaks, cracks, and drafts can help:
- Reduce energy bills
- Prevent water damage
- Improve home comfort
- Extend the life of building materials
- Avoid costly emergency repairs
Most homeowners can confidently handle these simple maintenance tasks with basic tools and a little preparation.
The key is acting early. Small problems are usually quick and inexpensive to fix, while neglected issues often become far more costly over time.
My Experience
Over the years, I’ve discovered that many household problems look far worse than they actually are. A dripping pipe, a small crack in the wall, or a cold draft around a window can often be fixed in less than an hour with basic DIY tools and materials.
One of the most common mistakes homeowners make is ignoring these minor issues until they become expensive repairs. I’ve personally dealt with leaking sink connections, hairline plaster cracks, and poorly sealed windows, and in most cases, the fixes were simple and inexpensive.
The biggest lesson I’ve learned is that regular inspections can save both money and stress. Spending a few minutes each month checking plumbing connections, wall surfaces, and window seals can prevent larger maintenance problems from developing later.
Key Takeaways
✔ Most minor plumbing leaks can be repaired by replacing PTFE tape and properly tightening fittings.
✔ Hairline wall cracks are usually cosmetic and can be repaired using flexible filler and paint.
✔ Draft-proofing windows and doors can help reduce heating costs and improve comfort.
✔ Regular home maintenance helps prevent expensive future repairs.
✔ Always investigate the cause of a problem before attempting a repair.
✔ Structural cracks, major leaks, or electrical hazards should be assessed by qualified professionals.
Related Articles
You may also find these guides useful on Elemon.co.uk:
- How to Build a Raised Garden Bed on a Budget
- DIY Smart Home Wall Panel (LED & Acoustic Foam)
- Complete Guide to Outdoor Solar Lighting
- Building a Modern Pergola for Your Garden
- The Smart Shopper’s Guide to Buying Home Tech in the UK
- Essential DIY Tools Every Homeowner Should Own
- How to Improve Home Energy Efficiency Without Major Renovations
UK Regulations & Safety Information
Before carrying out any home repairs, ensure you understand the relevant UK safety requirements.
Plumbing Work
- Minor repairs such as replacing seals, tightening fittings, and fixing small leaks can usually be carried out by homeowners.
- Any work involving mains water systems should be completed carefully to avoid water damage.
Structural Concerns
- Cracks wider than 5mm, diagonal cracks, or signs of movement around doors and windows should be professionally assessed.
- Serious structural concerns may require advice from a qualified structural engineer.
Working at Height
- If repairing cracks near ceilings or upper floors, always use a stable ladder and follow safe working practices.
Electrical Safety
- If leaks are located near electrical fittings, isolate the electrical supply and seek professional assistance before carrying out repairs.
Personal Protective Equipment (PPE)
When carrying out DIY repairs consider using:
- Safety glasses
- Protective gloves
- Dust mask when sanding filler
- Suitable footwear
Always read and follow the manufacturer’s instructions for all tools, fillers, sealants, and repair products.
Disclaimer
This article is intended for general informational and educational purposes only. The information provided reflects personal experience and research and should not be considered professional engineering, structural, plumbing, electrical, or legal advice.
Every property is different, and repair methods may not be suitable for every situation. If you are unsure about the cause of a problem or the safety of a repair, consult a qualified professional before proceeding.
Elemon.co.uk accepts no responsibility for injury, damage, loss, or costs resulting from the use of information contained within this article.
Image Disclaimer; All images are for reference purposes only. Actual products, materials, colours, tools, and installation methods may vary. Always follow manufacturer instructions and applicable UK regulations when carrying out DIY work or home repairs.