

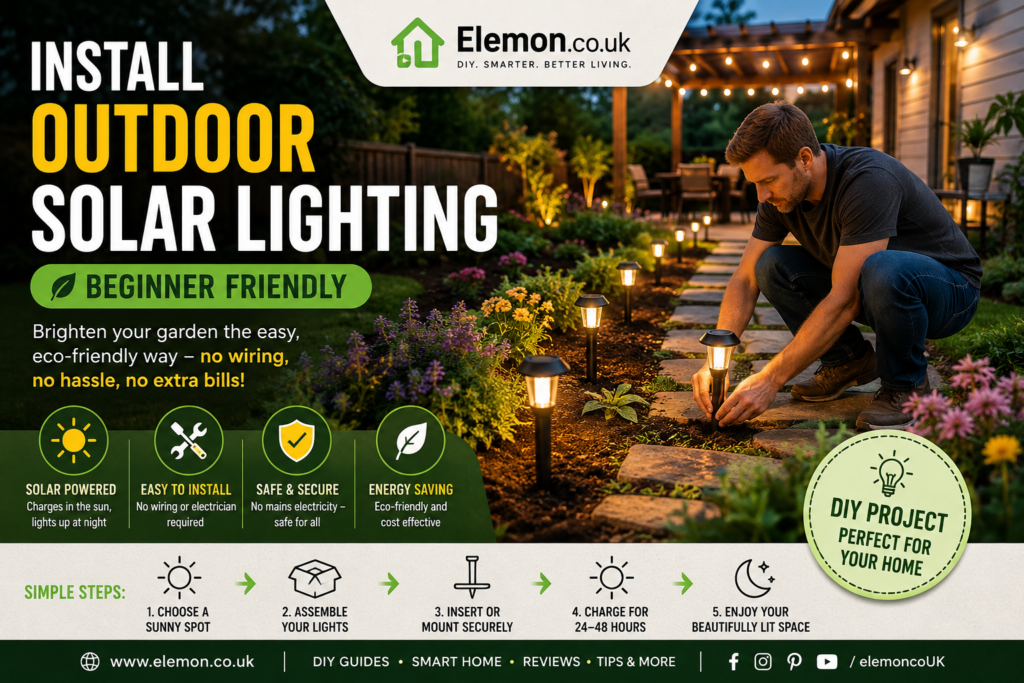
Brighten Your Outdoor Space with Solar Lighting
Installing outdoor solar lighting is one of the simplest and most affordable DIY projects for homeowners. Unlike traditional outdoor lighting, solar-powered lights require no electrical wiring, helping you improve your garden, patio, pathway, or driveway safely and efficiently.
Whether you want to create a welcoming atmosphere, improve visibility at night, or enhance your garden’s appearance, solar lighting offers a practical solution that anyone can install.
Why Choose Solar Lighting?
Solar lights have become increasingly popular because they offer several advantages:
Zero Running Costs
Solar lights recharge using sunlight, meaning they add nothing to your electricity bill.
Easy Installation
No cables, trenching, or professional electrical work is required.
Safe for Families and Pets
Because there is no mains electricity involved, solar lights are a safe option for gardens and outdoor spaces.
Automatic Operation
Most solar lights include built-in dusk-to-dawn sensors that automatically switch on at night and off during the day.
Low Maintenance
Aside from occasional cleaning and battery replacement after several years, solar lights require very little upkeep.
Types of Outdoor Solar Lights
Before purchasing, consider how you want to use your lighting.
| Solar Light Type | Best For | Installation Method |
|---|---|---|
| Path & Stake Lights | Garden paths, borders, driveways | Push directly into soil |
| String & Fairy Lights | Pergolas, fences, trees, patios | Hang using hooks or cable ties |
| Wall & Security Lights | Entrances, side passages, house numbers | Fix to walls with screws |
| Spotlights | Highlighting plants, statues, features | Ground-mounted or wall-mounted |
| Deck & Step Lights | Stairs, decking, pathways | Surface mounted |
Tools and Materials
Most installations require very few tools.
For Stake and Path Lights
- Solar lights
- Garden trowel
- Watering can (if soil is hard)
For Wall-Mounted Lights
- Solar light fixture
- Drill
- Appropriate drill bits
- Wall plugs
- Screws
- Pencil
- Screwdriver
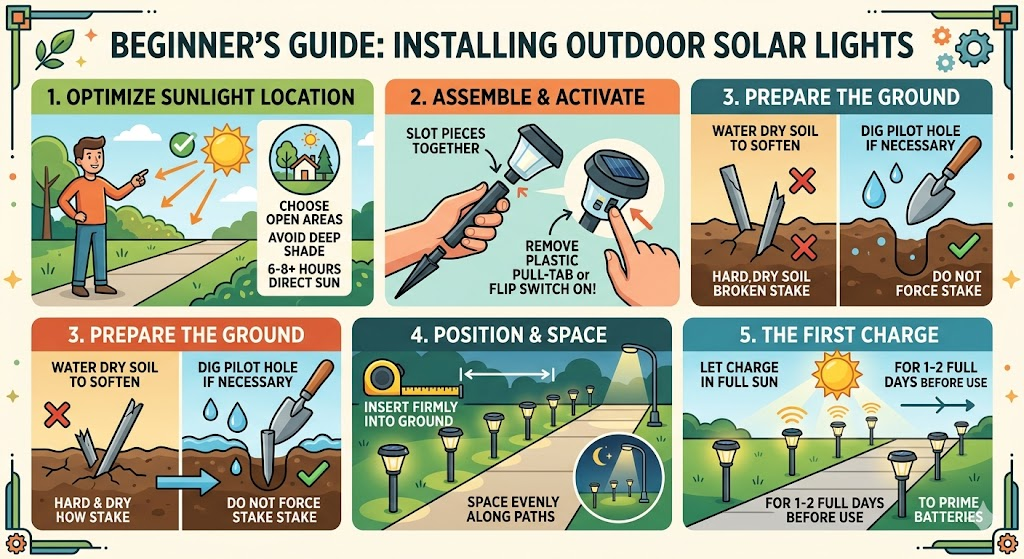
Step-by-Step Installation Guide
Step 1: Choose the Right Location
The most important factor for solar lighting performance is sunlight exposure.
Look for locations that receive:
- At least 6–8 hours of direct sunlight daily
- Minimal shade from trees or buildings
- Clear exposure throughout most of the day
Avoid
- Dense tree cover
- Deep fence shadows
- Permanently shaded walls
- Areas beneath roof overhangs
Step 2: Assemble the Solar Lights
Most solar stake lights arrive in separate pieces.
- Connect the light head.
- Attach the support tube.
- Secure the ground spike.
Important Beginner Tip
Before installation:
- Remove any battery isolation tab.
- Locate the ON/OFF switch.
- Ensure the light is switched ON.
Many installation problems occur simply because this step is overlooked.
Step 3: Prepare the Ground
Never force a plastic stake into hard or compacted soil.
If the Ground Is Hard
- Water the area beforehand.
- Use a trowel or screwdriver to create a pilot hole.
- Insert the stake gently and vertically.
This prevents broken spikes and keeps lights aligned properly.
Step 4: Install Path and Stake Lights
Once the ground is prepared:
- Position each light evenly along the pathway or border.
- Push the stake firmly into the soil.
- Check that the solar panel faces upward.
- Ensure no plants or objects block sunlight.
Spacing Guide
For most gardens:
- Small lights: 1–2 metres apart
- Larger pathway lights: 2–3 metres apart
Consistent spacing creates a cleaner and more professional appearance.
Step 5: Mount Wall or Fence Lights
For wall-mounted solar lights:
- Hold the fixture against the mounting surface.
- Mark screw locations with a pencil.
- Drill pilot holes.
- Insert wall plugs if required.
- Secure the fixture using screws.
Best Locations
- Front doors
- Side entrances
- Garages
- Garden sheds
- Fences overlooking pathways
Step 6: Allow a Full Initial Charge
After installation, allow the batteries to charge fully before expecting maximum performance.
Recommended First Charge
- Leave lights in direct sunlight for 24–48 hours.
- Avoid testing repeatedly during the charging period.
A full initial charge helps maximize battery performance and lifespan.
Maintenance Tips
Keep Solar Panels Clean
Dust, pollen, and dirt can reduce charging efficiency.
Clean panels every few months using:
- A soft microfiber cloth
- Warm water
- Mild soap if necessary
Avoid abrasive cleaning products.
Watch for Nearby Artificial Light
Bright outdoor lighting can interfere with built-in dusk sensors.
Avoid positioning solar lights near:
- Streetlights
- Security floodlights
- Bright porch lights
These can prevent lights from switching on automatically.
Winter Performance
Solar lights naturally perform differently during winter.
You may notice:
- Reduced brightness
- Shorter operating times
- Longer charging periods
This is normal due to shorter daylight hours and lower sunlight intensity.
Severe Weather Tip
If freezing temperatures or prolonged snow are expected, consider storing portable solar lights indoors until conditions improve.
Common Beginner Mistakes
❌ Installing lights in shaded locations
❌ Forgetting to remove battery tabs
❌ Forcing stakes into hard ground
❌ Placing lights too close together
❌ Expecting full brightness on the first night
❌ Neglecting to clean solar panels
Final Thoughts
Outdoor solar lighting is one of the easiest ways to improve the appearance, safety, and functionality of your garden without complicated installation or ongoing energy costs.
By choosing sunny locations, allowing proper charging time, and performing occasional maintenance, your solar lights can provide years of reliable illumination while enhancing your outdoor living space.
My Experience
Over the years, I have installed several types of outdoor solar lights around gardens, pathways, and patios. One lesson I learned early on is that location matters far more than the price of the light itself. Even budget-friendly solar lights can perform surprisingly well when placed in a sunny location.
I have also found that many people become disappointed with solar lighting simply because they install the lights in shaded areas or expect full brightness on the first evening. Giving the batteries a full 24–48 hour charge before use can make a noticeable difference.
For pathways and borders, stake lights are usually the easiest option for beginners. For security purposes, however, I prefer solar wall lights with motion sensors, as they provide brighter illumination when needed while still conserving battery power.
If I were starting again, I would focus on quality solar panels and battery capacity rather than simply choosing the brightest advertised light.
Key Takeaways
✓ Solar lighting is one of the easiest outdoor DIY projects for beginners.
✓ No electrical wiring or specialist skills are required.
✓ Choose locations that receive at least 6–8 hours of direct sunlight.
✓ Always check for battery tabs and ON/OFF switches before installation.
✓ Allow a full 24–48 hour initial charge for the best performance.
✓ Keep solar panels clean to maximise charging efficiency.
✓ Winter performance may be reduced due to shorter daylight hours.
✓ Quality placement is often more important than buying expensive lights.
Related Articles
If you enjoyed this guide, you may also find these articles helpful:
- Smart Home Starter Kits for Beginners
- DIY LED Strip Light Installation Guide
- Building a Modern Pergola for Your Garden
- Best Outdoor Lighting Ideas for UK Gardens
- Smart Garden Technology Worth Considering
- Outdoor Security Lighting: What You Need to Know
UK Regulations & Safety Information
One of the biggest advantages of solar lighting is that most installations do not involve mains electricity, meaning they typically fall outside the scope of electrical installation regulations that apply to wired outdoor lighting systems.
However, homeowners should still follow basic safety practices:
- Always follow the manufacturer’s installation instructions.
- Ensure wall-mounted lights are securely fixed to suitable surfaces.
- Use appropriate fixings for brick, masonry, timber, or fencing.
- Avoid creating trip hazards when positioning pathway lighting.
- Check products carry appropriate UK conformity markings where required.
- Dispose of rechargeable batteries responsibly through approved recycling schemes.
If your project involves any connection to your property’s electrical system, consult a qualified electrician and ensure compliance with current UK regulations.
Disclaimer
This article is based on personal experience, general DIY knowledge, and information believed to be accurate at the time of writing. It is intended for informational purposes only and should not be considered professional electrical, construction, or safety advice.
Every property and installation is different. Readers should assess their own circumstances, follow manufacturer instructions, and seek professional advice where appropriate. Elemon.co.uk accepts no responsibility for injury, loss, or damage arising from the use of information contained in this article.