
How I Would Build a Modern Pergola in the UK: Practical Advice from Planning to Completion
Over the last few years, I’ve noticed that more UK homeowners are investing in their outdoor spaces rather than focusing solely on indoor improvements. One project that consistently stands out is the modern pergola. It adds structure, creates a dedicated outdoor living area, and can completely change how a garden feels without the cost of a full extension or garden room.
If I were building a pergola today, I would focus on a simple, clean design using quality materials that can withstand the unpredictable British weather. In this guide, I’ll share the approach I would take, practical tips I’ve learned from researching outdoor structures, and important UK-specific considerations that every homeowner should know before getting started.
Why I Like Modern Pergolas
What attracts me to modern pergolas is their versatility. They work equally well in contemporary gardens and more traditional outdoor spaces.
A well-designed pergola can:
- Create a defined outdoor dining area
- Provide partial shade during warmer months
- Support outdoor lighting and heating
- Add visual interest to a plain garden
- Increase the usability of outdoor space throughout the year
- Potentially enhance the appeal of a property
Unlike enclosed garden rooms, pergolas maintain an open and airy feeling while still creating a sense of structure.
The Materials I Would Choose
If I were investing my own money in a pergola, I wouldn’t cut corners on the structural timber.
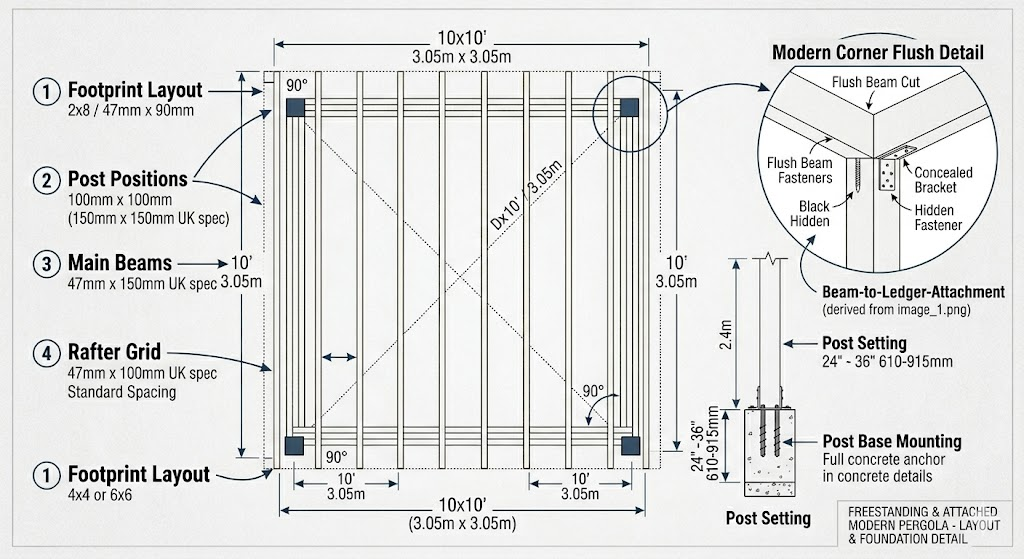
For UK conditions, I would recommend pressure-treated C24 timber because it offers good strength, availability, and durability.
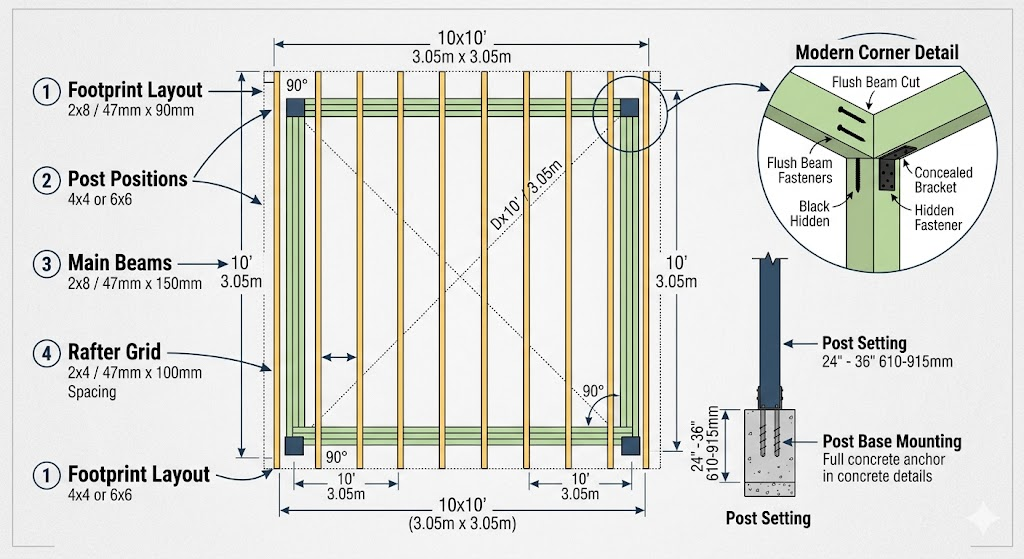
Posts
- 4 × 100mm × 100mm pressure-treated timber posts
- Alternatively, 150mm × 150mm posts for a more substantial appearance
Main Beams
- 4 × 47mm × 150mm treated beams
Roof Rafters
- 8–10 × 47mm × 100mm treated rafters
Hardware
One lesson many DIYers learn the hard way is that cheap fixings often fail long before the timber does.
I would always choose:
- Galvanised or powder-coated brackets
- Exterior-grade structural screws
- Coach bolts
- Heavy-duty post anchors
- Quality timber preservative
Given the amount of rain and moisture we experience in the UK, corrosion resistance is extremely important.

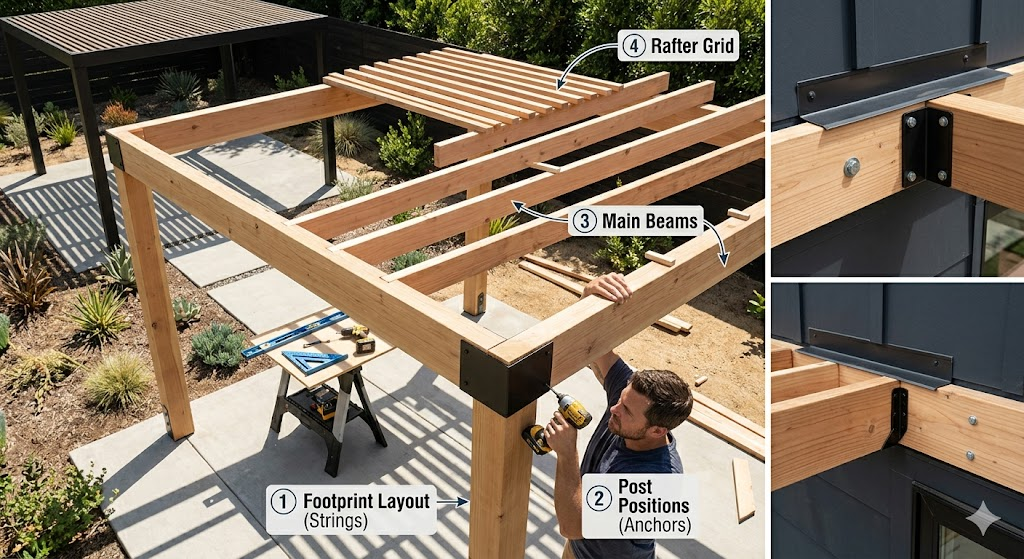
Step 1: Planning the Layout
The first thing I would do is carefully consider how the pergola will actually be used.
Many people focus solely on appearance and forget practical considerations such as:
- Garden furniture size
- Access routes
- Sun direction
- Privacy from neighbours
- Existing drainage
For most family gardens, a 3m × 3m pergola provides a good balance between functionality and cost.
I always recommend measuring the intended furniture layout first. It is surprising how quickly outdoor dining sets can fill a space.
Step 2: Installing the Posts Properly
In my opinion, this is the most important stage of the project.
Even a small error during post installation can cause problems throughout the build.
If installing directly into the ground:
- Dig holes approximately 600–900mm deep
- Use concrete or Postcrete
- Double-check alignment before the concrete sets
If building on an existing patio:
- Confirm the base is strong enough
- Use heavy-duty post anchors
- Avoid fixing into loose paving slabs
I would rather spend an extra hour checking levels and measurements than spend a weekend correcting mistakes later.
Step 3: Establishing a Consistent Height
For most UK gardens, a finished height around 2.4 metres works well.
It feels spacious without dominating the garden.
A laser level can save a huge amount of time here. If one isn’t available, a long spirit level and patience can achieve similar results.
Step 4: Building the Main Frame
When I look at professionally built pergolas, one thing always stands out: simplicity.
Modern designs work because they avoid unnecessary decorative features.
For a clean contemporary appearance:
- Keep beam ends flush
- Maintain consistent spacing
- Hide fixings wherever possible
- Use straight, clean timber
Attention to these small details often makes the difference between a pergola that looks homemade and one that looks professionally built.
Step 5: Installing Roof Rafters
The roof structure largely determines the final appearance.
I generally prefer rafter spacing of around 350–400mm because it creates a stronger visual effect while providing additional shade.
Keeping the rafters flush with the outer beams helps maintain the minimalist style that many homeowners are aiming for today.
My Favourite Finishing Touches
If I were designing a pergola for my own garden, I would consider:
LED Lighting
Warm white LED strip lighting hidden within beams can completely transform the space during the evening.
Outdoor Heating
Infrared heaters are becoming increasingly popular and can significantly extend the use of the pergola beyond summer.
Privacy Screens
Slatted timber screens can create privacy while maintaining airflow.
Climbing Plants
Plants such as jasmine, clematis, or climbing roses can soften the structure and help it blend naturally into the garden.
UK Planning Considerations
One of the questions I hear most often is whether planning permission is required.
In many cases, freestanding pergolas fall under Permitted Development rights.
However, rules can vary depending on:
- Local authority requirements
- Conservation areas
- Listed properties
- Height restrictions
- Boundary proximity
As a general guide, structures located within two metres of a boundary are usually expected to remain below 2.5 metres in height.
Before purchasing materials, I would always recommend checking with your local planning department if there is any uncertainty.
Practical Advice I Wish More People Knew
If there is one piece of advice I would give to anyone building a pergola, it is this:
Spend more time planning than building.
Most DIY problems come from poor measurements, rushed preparation, or underestimating ground conditions.
Another lesson is to budget for quality hardware. Good fixings may cost more initially, but they can dramatically increase the lifespan of the structure.
Finally, remember that timber is a natural material. Even pressure-treated timber benefits from regular maintenance, cleaning, and occasional re-treatment.
Final Thoughts
A modern pergola remains one of my favourite outdoor improvement projects because it offers a significant visual impact without requiring specialist construction skills.
With careful planning, quality materials, and attention to detail, homeowners can create an attractive outdoor living area that adds character, functionality, and long-term enjoyment to their garden.
Whether you’re planning a quiet seating area, an outdoor dining space, or a garden feature that ties the landscape together, a well-built pergola can become the centrepiece of your outdoor space for many years to come.
UK Safety, Planning & Construction Disclaimer
The information in this article is provided for general educational and informational purposes only. Building regulations, planning requirements, and property restrictions may vary depending on your location within the United Kingdom.
Before beginning any construction project, always:
- Verify current planning and permitted development rules with your local authority.
- Check for underground services, including electrical cables, water pipes, and drainage systems.
- Follow manufacturer instructions for all tools, fixings, and construction materials.
- Use appropriate personal protective equipment (PPE).
- Consult a qualified professional where structural safety is uncertain.
Elemon.co.uk accepts no responsibility for loss, damage, injury, or costs arising from the use of information contained within this guide. Homeowners remain responsible for ensuring all work complies with applicable UK regulations and health and safety requirements.
Disclosure: This article may contain affiliate links. If you purchase through these links, Elemon.co.uk may earn a commission at no extra cost to you.
Affiliate Disclosure: As an Amazon Associate, Elemon.co.uk may earn from qualifying purchases. This does not affect the price you pay and helps support the website.