
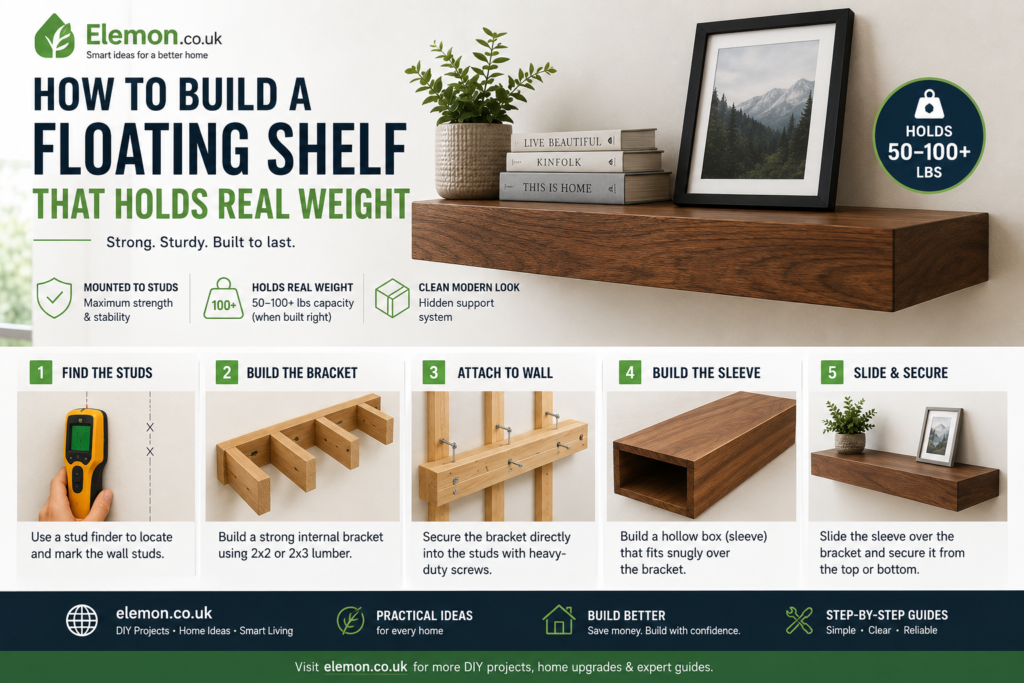
Floating shelves are a stylish and practical storage solution, but many DIY versions begin to sag when loaded with heavy books, dishes, or decorative items. The key to building a floating shelf that can safely support 50–100+ lbs is using a strong internal support structure and securing it directly into wall studs.
This guide explains how to build a heavy-duty floating shelf that looks sleek while delivering serious strength.
Why Most Floating Shelves Fail
Many off-the-shelf floating shelves rely on drywall anchors or lightweight brackets. While they may work for small decorative items, they often begin to droop under heavier loads.
A properly built shelf uses:
- A rigid internal support frame
- Direct attachment to wall studs
- A lightweight but strong outer sleeve
- Quality fasteners and adhesives
The Anatomy of a Heavy-Duty Floating Shelf
A strong floating shelf consists of two main components:
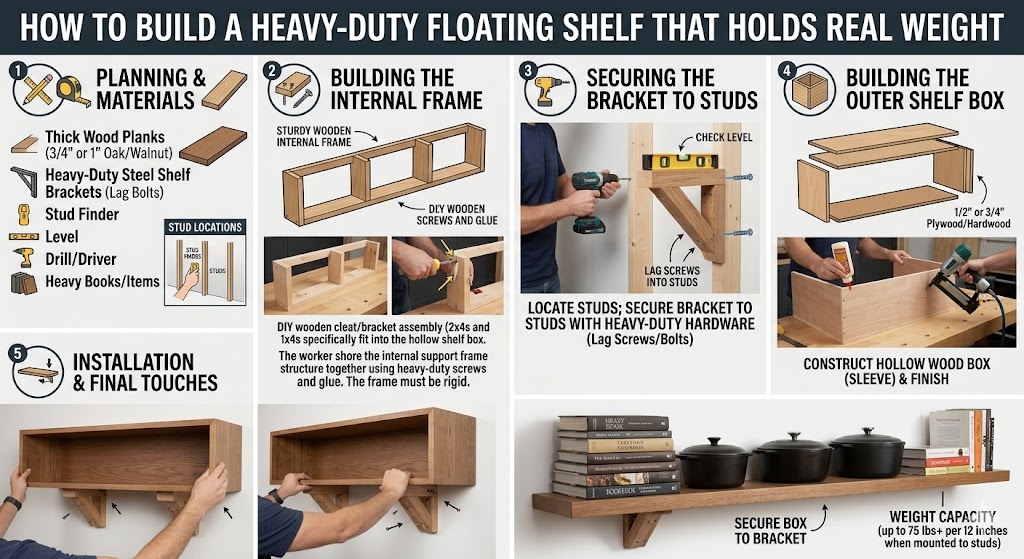
1. Internal Bracket (The Backbone)
This hidden framework is secured directly into the wall studs and carries the weight of everything placed on the shelf.
2. Outer Box Sleeve
A hollow wooden box slides over the bracket, creating the appearance of a solid floating shelf while concealing the support structure.
Tools & Materials
Materials
Internal Bracket
- Straight, knot-free 2×2 or 2×3 timber
- 3″–3.5″ structural screws
- Wood glue
Outer Sleeve
- ½” or ¾” hardwood plywood
- Solid wood boards for the front and side faces
- Brad nails
- Wood filler
Recommended Fasteners
- GRK structural screws
- Spax structural screws
- Similar heavy-duty wood screws
Tools
- Stud finder
- Spirit level
- Drill and driver bits
- Circular saw or mitre saw
- Table saw (optional)
- Brad nailer or clamps
- Tape measure
- Sandpaper or orbital sander
Step 1: Locate and Mark Wall Studs
The shelf’s strength comes from attaching it directly to the wall framing.
- Use a stud finder to locate the studs.
- Mark the centre of each stud.
- Verify locations by measuring standard stud spacing (typically 16″ / 400mm centres in many UK homes).
- Aim to secure the shelf into at least two studs, preferably three or more for longer shelves.
Important: Never rely solely on drywall or plasterboard anchors for heavy shelving.
Step 2: Build the Internal Bracket
Think of the bracket as a wooden comb.
Create the Back Cleat
- Cut a 2×2 to the shelf length.
- Leave allowance for the thickness of the shelf sides if required.
Add Support Fingers
- Cut several 2×2 pieces that extend outward from the wall.
- Make them 25–50mm shorter than the final shelf depth.
Assemble
- Space the fingers evenly.
- Ensure they don’t interfere with stud mounting locations.
- Secure them using:
- Pocket-hole screws, or
- Two 3″ screws through the back cleat into each finger.
Always pre-drill to prevent splitting.
Step 3: Build the Outer Box Sleeve
The sleeve should fit tightly over the bracket.
Cut Components
- Top panel
- Bottom panel
- Front face
- Two side pieces
Assemble
- Apply wood glue along all joints.
- Clamp or pin with brad nails.
- Leave the back completely open.
Professional Finish Tip
Mitre the corners at 45° where the front face meets the side pieces.
Benefits:
- Conceals plywood edges
- Creates the appearance of a thick solid timber shelf
- Produces a cleaner, furniture-grade finish
Step 4: Mount the Bracket to the Wall
This is the most important stage.
Installation Process
- Position the bracket against the wall.
- Place a spirit level on top.
- Mark stud locations onto the back cleat.
- Pre-drill mounting holes.
- Drive 3–3.5″ structural screws through the cleat and into the wall studs.
Check for Strength
Before proceeding:
- Pull downward firmly on the bracket.
- Apply moderate body weight.
- Ensure there is no movement, flexing, or bounce.
A correctly installed bracket should feel like part of the wall.
Step 5: Install the Shelf Sleeve
Once the bracket is securely mounted:
- Slide the finished shelf sleeve over the bracket.
- Check for a snug fit.
- Secure it discreetly by driving countersunk screws:
- Through the top into the support fingers, or
- Through the underside where they remain hidden.
Fill screw holes if visible.
Finishing the Shelf
Before installation, consider:
Sanding
- 120-grit
- 180-grit
- 220-grit finish sanding
Finish Options
- Clear polyurethane
- Hardwax oil
- Danish oil
- Wood stain followed by protective topcoat
- Paint for a modern finish
Allow all finishes to cure fully before loading the shelf.
Rules for Maximum Weight Capacity
Keep the Shelf Depth Reasonable
The deeper the shelf extends from the wall, the greater the leverage applied to the bracket.
Recommended depth:
- 8–10 inches (200–250mm) for heavy loads
Distribute Weight Properly
Place heavier objects near the wall:
Good examples:
- Books
- Plates
- Storage boxes
Keep lighter decorative items toward the front edge.
Use More Studs
A longer shelf attached to three or four studs will outperform a shorter shelf attached to only two.
Upgrade to Steel for Extreme Loads
For a thinner shelf profile with exceptional strength, consider using welded steel blind shelf brackets.
These systems:
- Bolt directly into studs
- Use solid steel rods
- Allow a slim shelf appearance
- Can support substantially greater loads than timber brackets
Expected Weight Capacity
Approximate capacities when properly built and mounted into studs:
| Shelf Length | Typical Capacity |
|---|---|
| 600mm (24″) | 50–75 lbs (23–34kg) |
| 900mm (36″) | 75–100 lbs (34–45kg) |
| 1200mm (48″) | 100+ lbs (45kg+) |
Actual capacity depends on:
- Stud quality
- Fastener type
- Bracket design
- Shelf depth
- Load distribution
Final Thoughts
The difference between a decorative floating shelf and a truly load-bearing one comes down to what you can’t see. By building a rigid internal bracket, anchoring it securely into wall studs, and fitting a well-made sleeve over the top, you can create a floating shelf that looks minimalist while supporting substantial weight for years to come.
My Experience
I’ve built several floating shelves over the years, ranging from simple decorative shelves to heavy-duty storage solutions for books, tools, and kitchenware. The biggest mistake I made on my first project was relying on drywall anchors instead of securing directly into wall studs. Within a few months, the shelf began to sag noticeably.
After switching to a stud-mounted internal bracket design, the difference was remarkable. One shelf in my home office has been supporting large reference books and electronics for over two years without any signs of movement. In my experience, investing extra time in locating studs accurately and building a solid internal frame is what separates a professional-quality floating shelf from one that eventually fails.
If you’re building a shelf for heavy items, don’t cut corners on the hidden structure. Nobody sees the bracket, but it determines whether your shelf lasts for years or months.
Key Takeaways
✔ Always secure floating shelves directly into wall studs.
✔ Use structural screws rather than standard drywall screws.
✔ A torsion-box style shelf provides excellent strength while remaining lightweight.
✔ Keep shelf depth between 8–10 inches (200–250mm) for heavier loads.
✔ Place heavier items closer to the wall to reduce leverage.
✔ Consider steel blind shelf brackets for ultra-slim, high-capacity shelves.
✔ Accurate measuring and levelling are just as important as strong materials.
Related Articles
If you enjoyed this project, you may also find these guides useful:
- DIY Smart Home Wall Panel (LED + Acoustic Foam)
- How to Build a Raised Garden Bed on a Budget
- DIY Garage Storage Solutions for Small Spaces
- Smart Home Upgrades That Add Real Value
- Essential Woodworking Tools Every DIYer Should Own
- Outdoor Solar Lighting Installation Guide
- Beginner’s Guide to Home Workshop Setup
UK Regulations & Safety Information
Before drilling into walls, always check for hidden electrical cables, water pipes, and gas lines using an appropriate detector.
When working in UK homes:
- Follow current Building Regulations where applicable.
- Use suitable fixings for the wall type (timber stud, masonry, plasterboard, etc.).
- Wear appropriate PPE including safety glasses, hearing protection, and dust masks.
- Ensure shelves installed in family homes are securely fixed to prevent accidental collapse.
- If mounting shelves in rented properties, obtain permission from the property owner if required.
For exceptionally heavy loads or commercial applications, seek advice from a qualified builder or structural professional.
Disclaimer
This article is intended for informational and educational purposes only. All DIY projects are undertaken at your own risk. Elemon.co.uk accepts no responsibility for injury, property damage, or losses resulting from the use of information contained in this guide.
Always follow manufacturer instructions for tools, fasteners, brackets, finishes, and construction materials. If you are unsure about any aspect of the installation, consult a qualified professional before proceeding.
All Images Are for Reference Purposes; Images used in this article are provided for illustrative and reference purposes only. Actual materials, dimensions, finishes, and installation methods may vary depending on your project requirements, available tools, and wall construction.